How to Design a small wicking aquaponics system (Lean Startup's Actionable Metrics)

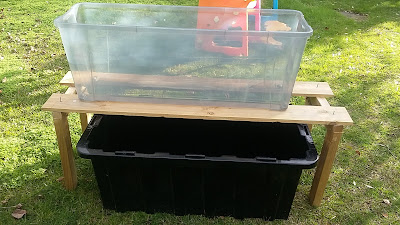
1. Get your fish-tank.
| actionable metrix | quantity quality |
| number of animals | litres per animal |
| table tub's footprint | free ground area |
| affordability | $ |
| toughness | thickness and material |
| solar heat | how to protect from sun |
A. size
The recomended minimum size for a fishtank is 200 Liters as one block unit.
B. shape retainers
Drill 2 holes on opposite sides and tie some strong string as 'braces' to prevent the tank from buckling when it's full. The top 'oblong' shape will (bulge) bend outwards when the tank is full, and this will cause cracks.
Cost: $60

2. Build your table to sit above the fish tank
Click Here for >>> Free Plans for stable table <<<| actionable metrix | quantity quality |
| kickability | a swinging 30kg weight |
| fixity of angles | rigid corners |
| fixity of angles | weight strained on wood not nails |
| longevity | H4treated wood vs. rot |
The table should be light enough for you to carry into place during installation.
if you can attach wheels to the whole thing, so you can move the kit. Great!

3. Get your wicking-bed tank
| The wicking bed should be at least 30cm deep, and a max of 40 to 50 cm deep. Having one wicking bed instead of two or more in sequential series, is better. One wicking bed wont fail you, but two wicking beds may result in one tank emptying and the other not. Cost: $20 |  |

4. Construct the wicking bed.
Click Here for >>> Free plans to make wicking bed <<<
Drill the holes carefully for the pipes 10cm up from the bottom.
And drill the enough holes on the long drain pipe .
fix the pipes into their place.
Cut The wicking cloth (geotextile) should be large enough to create a cornered bag to keep the dirt out of the water.
Dont lift the tubs if they are full of stuff. the plastic will break.
5. Fill the wicking bed
Put the wicking bed's tub on the table first.
A. base pebbles = "biological surface area" material
Fill it 10cm with stones up to the drain pipe.
Cost : Rocks = $20
B. Drainage Pipe
Install the drainage pipe at the chosen water level.Seal the ends of the pipes with gauze or wicking material tied with a string in a ring. (to stop stones going in the pipe)
C. Wicking cloth
Place the wicking cloth in the wicking bed on top of the stones.Actionable Metrics: Wickability of different materials, soil permeability, rot & age replacement, shape of cloth regarding the container (3d net), combination of geotextile and fabric.
Wicking Material table Does cloth lift water against gravity?
| Material | wicks? |
| Cotton T-shirt (Linen) | yes |
| Cotton bath Towel | yes (Best) |
| Cotton bed sheet | no |
| nonwoven geotextile | no |
| Polyester/Acrylic cloth | no |
Best option: the bath towel is designed to soak up water. loosely Woven material are not (low thread count), artificial material rejects water and so cotton t-shirt fabric is second best.
D. shape the stones and contour of cloth
Mold bottom stones to allow water to touch the top layer, remembering the water drains at the pipe level.Actionable Metric: what shape for Contour? You can make the stones surface flat or mount them with a highest ridge at the pipe.
E. fill the top layer with dirt
Fill the top of the Wicking material, with rich black composted potting mix.
Cost: Actionable Metrics: Nutrient richness of soil, composition of soil , is the soil retained within the wicking cloth or leaking into the fishtanks? soil = $40
6. Set up Solar Pump between fish tank and wicking bed
Get your *working* solar panel and fountain pump. and get your tubing that will fit inside the pump's hole.If the tubing is the perfect size for the pump's hole, then it'll be tough:
Just dip the tip of the plastic tubing in a cup of boiling hot water, and the tubing will soften up enough to squeeze into the hole.
You must test the pump's achieved height. in noon sunlight. Remember to level the tubing flatly once at the proper height, since you're testing the pump's fight against gravity.
Cut the pipe to reach from the water tank floor, to the top of the wicking bed, and allow an extra 10cm for the corner bend and hang over.
Drill two string holes 2 cm apart, along the top lip of the wicking bed to hold strap two ends of a wire.
Then you can fasten the top of the pump's tubing to the wicking bed's lip, with a simple few slightly-spaced loops
Now you need to construct a netting to protect the pump from the aquaculture (fish and seaweed).
and remember: the height of the pump above the fish-tank floor, sets the emergency water height
so place the pump and netting, on top of something like a shelter-tubes. so that the water isn't emptied completely in an accident.

Comments
Post a Comment